Do you get jealous and inspired at the same time when you see someone posting a cover or an original track online, and it just sounds so good (or not) that it makes you want to do the same? Hoping that you could have your own home recording studio setup.
How often do you find yourself saying, “I want to record my own songs” or something like “how I wish I had the same setup at home!”
The only problem is that you don’t know where to begin, what exactly to buy, and how much to invest.
Well…
You are in for a treat because I will guide you through everything that you need, and it won’t be about the most expensive gears on the market. It’s how to build your home recording studio on a realistic budget you can afford.
Expensive gears can give you an advantage, but with enough practice and the desire to improve you will produce a decent sound even with just a few decent gadgets.
Here is the list of materials you will need to have for your home recording studio.
- Computer - Desktop Or Laptop
- Aduio Interface
- DAW - Digital Audio Workstation
- Midi Keyboard
- Microphones
- Pop Filter
- Headphone
- Studio Monitor Speakers
- Acoustic Foams
Now that you have the list, it’s time we elaborate on the essential details about each item on this list.
It's a must!
This one is pretty obvious. You simply can’t do a digital recording if you don’t have a desktop or a laptop to work on.
But… How should I know that my computer or laptop specs will be enough to help me get started with my home recording setup?
Desktop or Laptop Minimum Requirement
Instead of discussing how much to spend on a computer or laptop, let’s instead discuss the minimum computing power requirement or specification of the computer or laptop you will need for recording.
The specs I will be sharing here will only be an average or a general overview of the minimum requirement. The higher the specs you can get, the better.
Regardless if you are a Mac or Windows user, the following should be the minimum specs:
- Intel of AMD Dual Core CPU or Higher
- 4 Gigabytes of RAM
- 8 Gigabytes of installation space for the program you will be using (can be more)
- 250 Gigabytes of Storage or Higher if Possible
- Display resolution of 1280 x 800 or higher is recommended
Now that you have these specs visit your local computer shop and ask how much it will cost you to have a computer or a laptop with these requirements.
Mainly, you want to have the fastest computer or laptop that is within your budget.

A crucial part of your home recording setup is a piece of device that captures and produces the sound of your recording. The quality of your recording is entirely anchored on the quality of your audio interface.
The biggest mistake that beginners commit when they are still starting in their music production is trying to fix everything in the editing phase.
Never do that!
You have to understand that to be able to get a sound output, the input or the capture of audio should be right from the start. Editing is more about enhancing than fixing.
That is why you must invest in a quality audio interface.
The Built-in Audio Interface
Your desktop or laptop computer has a built-in audio interface. I started my recording career with the only audio interface available for me at that moment.
I was able to create some decent output (although not as good as today), but I was ready to start producing music!

For example, you can use Realtek High Definition Audio, which is a pretty common audio device that comes with your desktop or laptop computer.
It’s good to know that you can create recordings of your music with your computer’s audio card if you don’t have the funds to buy an external audio interface for the time being.
The ASIO4ALL Audio Interface Solution
If you find yourself working on your built-in interface and it sounds like crap, don’t despair. There is a piece of software that helps you emulate a proper ASIO to help you create better recordings and help you run your DAW smoothly.
A German programmer who goes by the name of Michael Tippach back in 2003 decided to help those who didn’t have a native ASIO. So, he launched ASIO4ALL.
It’s a piece of software that emulates an ASIO environment so that your DAWs will work on your computer even if you don’t have an external audio interface.
What are the benefits of using ASIO4ALL?
- Reduces Latency In Your Recording
- It's Compatible With Almost Every DAW
- It Works With Small Buffer Sizes
- IT'S FREE!
The External Audio Interface
Using an external audio interface for your home recording setup gives you better quality output for your music and more customization settings in capturing your audio.
There are plenty to choose from in the market, but here are two examples of audio interface I have been using over the years.
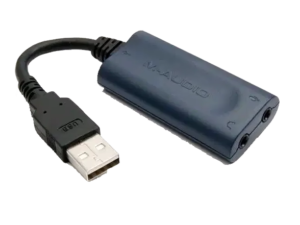
I am not sure if they still produce this item, but it sure is a powerful single-channel audio interface. I was able to create hundreds of recordings in my early days with this little bad-ass of an interface.

Focusrite 2i2 Bundle
Focusrite 18i20
Again, there are plenty to choose from in the market today, but I love to use these two devices mentioned above.
Using an external audio interface for your home recording setup gives you better quality output for your music and more customization settings in capturing your audio.
There are plenty to choose from in the market, but here are two examples of audio interface I have been using over the years.
I am not sure if they still produce this item, but it sure is a powerful single-channel audio interface. I was able to create hundreds of recordings in my early days with this little bad-ass of an interface.
Cubase by Steinberg
Logic Pro by Apple
Garage Band by Apple
Reason
Ableton
FL Studio
Now when it comes to choosing which DAW perfectly fits your need, it all boils down to the following requirements:
- Availability of Funds
- Personal Preferences
- The Familiarity of the Interface
There are still a lot of DAWs out there in the market, try which one suits you.

Like we’ve mentioned, most DAWs come with free sampled libraries, and these libraries can be used in your music production using a midi keyboard.
MIDI stands for Musical Instrument Digital Interface. A midi keyboard allows you to play those sample libraries from your DAW.
We won’t be going into the nitty-gritty side of what MIDI is and where it came from, all you need to know right now is that it can help you produce your music in the recording process.
You can create an entire orchestration or just a simple piano track using just your midi keyboard.
The one I’m using is an M-Audio Keystation 88
Can I use A Yamaha, Roland, Or Any Keyboard As A Midi Keyboard?
Yes, you definitely can, and all you need is a midi USB interface that will connect your instrument to your computer.
Something like this.

For your home recording studio setup concerns, I recommend you start only with one or two microphones. Eventually, you will be collecting more microphones as you progress.
The subject of Microphones is a very broad one that it requires an entirely separate post to cover everything. Right now, we only need to know what are some microphones I can recommend for you to use for your beginning home recording studio setup.
What Can You Record At Home Using Microphones
- Lead and Backup Vocals
- Acoustic Guitars
- Violins, Ukulele and Other Instruments Alike
- Your guitar or bass amps
A Reminder About Recording Drums At Home for Beginners
The topic of recording drums is a complicated subject because you need to consider many things.
- Acoustic Response of Your Room
- The Quality of Your Drum Kit
- Pickup Pattern of Your Microphone
- and many more...
Unless you already know the nuances of capturing quality sound out of a drum kit, I recommend you use a virtual drum or a drum patch from your DAW’s sample library.
Moving on, here are some of the microphones I’ve tried which you can definitely use at home for those who are still starting their home recording studio.
Condenser Mics That Needs An Audio Interface

Scarlett Studio CM25

Audio Technica AT2020

Rode NT1A
These microphones are recommended microphones because they aren’t that expensive, and the sound quality they produce is excellent.
USB Microphones - No Need For An Audio Interface
For people who don’t have the funds to buy an audio interface as of the moment, USB Microphones are an excellent option. They are plug and play microphones that saves you the hassle of setting up more connections to record audio.
A USB Microphone has the following advantage
- No audio interface needed
- You only need the USB port of your desktop or laptop
- The microphone takes its power from the USB port
- Your DAW automatically detects the microphone for recording
Should I Use A USB Mic or an XLR Mic?
The short answer is, it depends upon your personal preference. Most podcasters, beginner producers, and those that want to have a more manageable set up will probably choose a USB Microphone.
On the other hand, XLR microphones offer more adjustability and capability when it comes to production. Usually, people who started with USB microphones tend to upgrade to XLR as they gain more experience.
Examples of USB Microphones
- Blue Yeti USB Microphones
- Samson Meteor
- Samson CO3U USB Mic
- Rode Podcaster
Some microphones offer the best of both worlds – both an XLR and a USB Mic
- Samson Q2U
- Blue Yeti Pro
What Are The Main Differences Between XLR and USB Microphones?
If you are currently confused about which type of microphone to buy, here are some considerations you can consider to help you make a purchasing decision.
XLR Microphones
- It offers a lot more customization and control since it is connected through an audio interface.
- It is a lot more expensive, and you need to invest more. You simply can’t use an XLR mic without spending on an audio interface
- You cannot bring it around quickly because it’s not portable. If you need to move it elsewhere, you need to move the audio interface with it.
- It’s easier to replace parts of it when you need upgrades or fixing.
USB Microphones
- It is highly portable and transportable. It’s a plugin and play microphone. All you need is your laptop, and you can start working anywhere.
- You don’t have much control or customization because it doesn’t go through an audio interface.
- No need to route it in a mixer because all you need is the USB port of your desktop or laptop.
- You can’t replace parts when they break. Usually, when they break, you need to buy a new microphone altogether.
- Less investment is required; that is why it's mostly the first choice of beginners.

When you are recording on a condenser mic, chances are you are going to get lots of artifacts in your recording especially for vocals.
These artifacts can be the sound of a singer’s breath or the plosives you get from certain letters like P or B and sibilance from words that begin with letter S.
A pop filter is the solution for all of these concerns. When you buy a microphone, some mics come with a free pop filter in the package. If it doesn’t then you need to buy one.
By the way, just in case you are interested to learn more about singing, I wrote the following articles.
How To Judge A Singing Competition Accurately
Important Step In Preparing For A Singing Competition
Headphones are a crucial part of a home recording studio setup. When you are recording your vocals, you need headsets so you or the singer can sing along with the music.
There are many brands of headsets out there in the market, each with different features for each brand.
There are two main types of headsets that you need to know.
Examples of Recommended Headphone Brands
- Sennheiser HD280 Pro
- Sony MDR-7506
- Extreme Isolation EX-29
- Beyerdynamic DT770 Pro
- Focal Spirit Professional
- Shure SRH 1540
For a home recording studio setup, most headphones can do the job, but if you do have the funds to purchase a decent one, check out any of the mentioned brands.
Open-back Headphones, as we’ve mentioned, are used for mixing your recordings, but if you have the funds to buy studio monitors, then I recommend you do so.
Can I Use Any Speakers At Home for Mixing?
Studio monitor speakers are not your average consumer speakers that already have various tonal enhancements.
Studio Monitors are calibrated to provide a flatter response than the usual consumer speakers or stereo speakers you have at home. Studio monitors provide a pure, uncolored sound, which is crucial in your mixing decision makings.
How much should I spend on studio monitors?
It depends. Your main goal of purchasing one is to ensure that you hear your audio as flat as possible so that your mixes travel well.
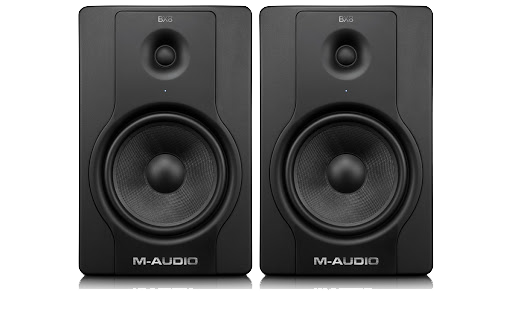
The one I’m using right now at home is an M-audio BX8 Studio Monitor.

There are a lot of studio monitors out there in the market today and here are a few of them if you want to check them out.
- KRK Rokit 5 G3
- Yamaha HS8
- Event 20/20 BAS
- Dynaudio BM5 mkIII
- Mackie HR824 mkII
- Neumann KH 120
- Adam Audio A7X
- Genelec M040
Room acoustics go far beyond placing acoustic foams or related materials on the wall of your home studio. It’s a science of how your room would react to specific frequencies, and these reactions can affect the sound of your mixes.

We will not be covering that area in this article. For every home recording studio setup, acoustic foams can help control some problematic areas of your room.
In my case, my room would have this little reverb, which gets in the way of my recording, so I had to place acoustic foam to lessen the reverb and get a more dry sound.
These are my list of of essential gears you will need to start creating music in the comfort of your home. If you are going to ask me how much will you be spending, that will totally depend on the specs of gear you will be buying. Your personal preferences and a bunch of other factors that will help you make that purchasing decision.
So, what do you think should I add to my list that I missed? Let me know in the comments.